This is an old revision of the document!
Table of Contents
VRayScatter For Maya Manual
VRayScatter For Maya is a plug-in for Maya which works with V-Ray rendering system. It is possible to create complicated scenes with a huge amount of objects easy and quickly with the aid of this plugin.
Usually scenes in Maya with a great amount of even identical objects take a lot of space on HDD, consumes a lot of time for loading, and it is very hard to work with. VRayScatter For Maya is created to solve these problems.
The scene containing 500 000 identical objects created with Maya 2008 occupies 1400Mb of HDD space. Now, if it is created with VRayScatter For Maya and still containing the same 500 000 objects the scene can take just 250Kb.
The most exciting feature of VRayScatter For Maya is a quick generation of an array of objects right before rendering. Those very 500 000 objects are created in only 2 seconds before rendering.
Another outstanding VRayScatter For Maya ability is uploading and downloading from VRayProxy memory if needed (as and when necessary). This allows the application of polygon models without missing productivity and capacity of RAM. Animated objects support and animated VRayProxy support allows creating huge amounts of animated objects. Now with VRayScatter For Maya it is possible to create the whole forest of wind-shaken woods. The support of 64-bit systems and multi-core processing allows VRayScatter For Maya to create and render, for example, forest or even a city in a blink of an eye.
System Requirements
Operating system:
- Windows
- Mac OS X
- Linux
Maya versions:
- Windows: 2016, 2016.5, 2017, 2018, 2019, 2020, 2022
- Mac OS X: 2016, 2016.5, 2017, 2018, 2019, 2020
- Linux: 2016, 2016.5, 2017, 2018, 2019, 2020, 2022
V-Ray versions:
- Windows / Linux / Mac OS X: 3.6, 4.x (Next), 5
NOTE:
- User must be able to obtain root permissions (using sudo, for example) to install VRayScatter For Maya.
Rendernodes:
- VRayScatter without activation supports only batch render from command prompt (render.exe or mayabatch.exe) and rendering with vray standalone.
- For rendering from Maya GUI (render→batch render) activation is required
Upgrade from 2.x.x to 4.x
Version 3.x.x and 4.x now uses only one V-Ray plugin file and since version 4.514 installs only a module, so you have to remove old conflicting plugins:
- Windows: uninstall previous version of VRayScatter For Maya using the uninstaller.
- Linux: remove libvray_GeomRamProxy.so and libvray_TexVRayScatter.so from /usr/autodesk/maya<MAYA_VERSION>-x64/vray/vrayplugins/
- OS X: remove libvray_GeomRamProxy.so and libvray_TexVRayScatter.so from /Applications/Autodesk/maya<MAYA_VERSION>/Maya.app/Contents/vray/vrayplugins/
- DR nodes: manually remove libvray_GeomRamProxy.* and libvray_TexVRayScatter.*
Windows
Installation
Please, make sure that you've downloaded the latest version of the plug-in from our forum
To install the program you need to run the VRayScatterForMaya-<version>.exe with the administrator rights.
please note, since version 4.514, installs only a module
Don’t forget to quit Maya before you start the installation (please check Task Manager too for any running instances of Maya).
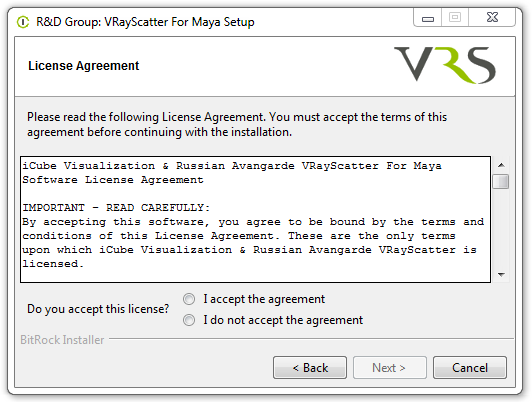
Read the license agreement carefully. If you accept the license the click “I Agree” otherwise press “Cancel”:
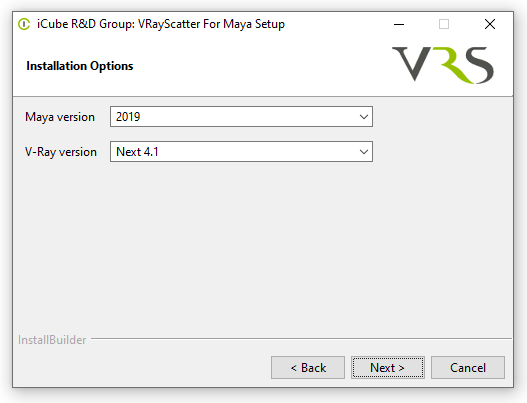
Choose Maya and V-Ray versions:
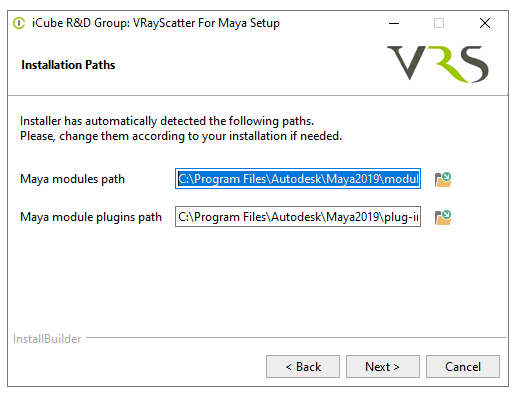
Check installation paths
Start Maya and enable Load and/or Auto load in Window → Settings/Preferences → Plug-in Manager for the VRayScatter plug-in.
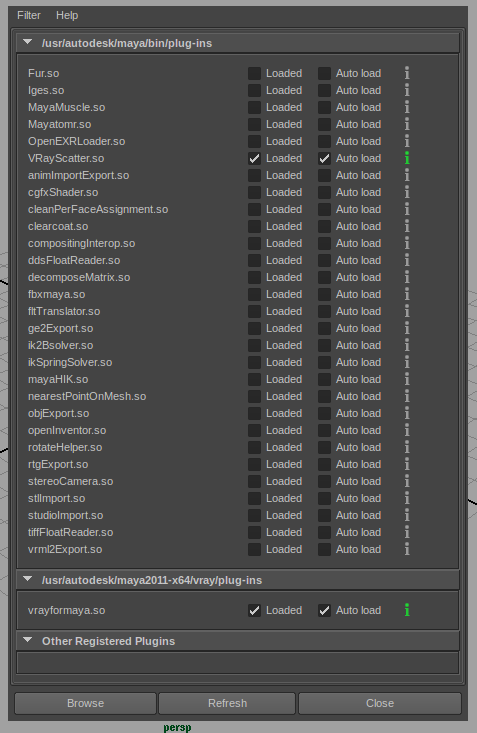
Installation on Windows Rendering nodes
Batch Rendering
install same as workstation but without activation
or manually copy files
Distributed Rendering
Copy vray_VRayScatter.dll from MAYA_ROOT\plug-ins\vrayscatter\vrayplugins to VRAY_STANDALONE/vrayplugins (or MAYA_ROOT/vray/vrayplugins) on render nodes.
(or whichever folder is used for loading vray plugins from, the folder is usually called /vrayplugins and locates within your V-Ray installation)
For example, from:
C:\Program Files\Autodesk\Maya2020\plug-ins\vrayscatter\vrayplugins
to:
C:\Program Files\Chaos Group\V-Ray\Standalone for x64\vray\vrayplugins
Uninstall
To uninstall VRayScatter use the uninstaller: Start menu > R&D Group > VRayScatter For Maya > Uninstall
Activation
please see: http://docs.rendering.ru/en:cerber-protection
Linux
General
Please, make sure that you've downloaded the latest version of the plug-in from our forum
Installation On Linux
Please, make sure that you've downloaded the latest version of the plug-in from our forum
Unpack the archive, open your preferred terminal application, obtain root permission
Installer has a graphical interface on all supported platforms:
$ sudo -i
# VRayScatterForMaya-x.xxx.run
or you can also run text installation mode
$ sudo -i
# VRayScatterForMaya-x.xxx.run --mode text
Select you Maya/V-Ray versions, files will be copied to the following folders according to your setup, e.g:
Maya module path  /usr/autodesk/maya2019-x64/modules/VRayScatterForMaya.mod
Maya module plugin path /usr/autodesk/maya2019-x64/plug-ins/vrayscatter
NOTE:
- Change the installation paths depending on your setup
- change paths in VRayScatterForMaya.mod file according to your environment, if needed
- command should be executed with root permissions
Installation On Linux Render Nodes
Batch Rendering
Same as for workstation, but without activation
Run installer, extract files and then copy across rendernodes
And check .mod file for variables
Distributed Rendering
For V-Ray “Distributed Render” node installation you only need to copy V-Ray plugin file libvray_VRayScatter.so e.g :
$ sudo -i
# cd ~/where/you/have/extracted/files/to/
# cp libvray_VRayScatter.so /usr/autodesk/maya2018/vray/vrayplugin/
Uninstall
To uninstall VRayScatter For Maya you have to manually remove all the installed files.
Activation on Linux
please see: http://docs.rendering.ru/en:cerber-protection
Mac OS X
Installation on Mac OS X
Please, make sure that you've downloaded the latest version of the plug-in from our forum
Unpack the archive, open your preferred terminal application, obtain root permission and start coping files:
$ sudo -i
# cd ~/where/you/have/unpacked/the/archive
Select you Maya/V-Ray versions and copy the plugins. Here is an example for the default paths of Maya 2012 and V-Ray 2.2:
# cp plugins/workstation/maya2012_vray22_x64/VRayScatter.dylib /Applications/Autodesk/maya2012/Maya.app/Contents/MacOS/plug-ins
# cp plugins/workstation/maya2012_vray22_x64/libvray_VRayScatter.so /Applications/Autodesk/maya2012/Maya.app/Contents/vray/vrayplugins/
Install the Maya UI files:
# cp ui/AEVRayScatterTemplate.mel /Applications/Autodesk/maya2012/Maya.app/Contents/scripts/AETemplates
# cp ui/AEVRayScatterTextureTemplate.mel /Applications/Autodesk/maya2012/Maya.app/Contents/scripts/AETemplates
# cp ui/rdgroupVRayScatter.mel /Applications/Autodesk/maya2012/Maya.app/Contents/scripts/
# cp ui/rdgroupMenu.mel /Applications/Autodesk/maya2012/Maya.app/Contents/scripts/
# cp ui/rdgroupProc.mel /Applications/Autodesk/maya2012/Maya.app/Contents/scripts/
Install the V-Ray texture description file:
# cp shaders/VRayScatterTexture.txt /Applications/Autodesk/maya2012/Maya.app/Contents/vray/shaders
NOTE:
- Change the installation paths depending on your setup
- # - means that command should be executed with root permissions
Installation On Mac OS X Batch Render Nodes
Change directory to where you have unpacked the archive:
$ sudo -i
# cd ~/where/you/have/unpacked/the/archive
Select you Maya/V-Ray versions and copy the plugins:
# cp plugins/batch/maya2012_vray22_x64/VRayScatter.so /Applications/Autodesk/maya2012/Maya.app/Contents/MacOS/plug-ins
# cp plugins/batch/maya2012_vray22_x64/libvray_VRayScatter.so /Applications/Autodesk/maya2012/Maya.app/Contents/vray/vrayplugins
Install the V-Ray texture description file:
# cp shaders/VRayScatterTexture.txt /Applications/Autodesk/maya2012/Maya.app/Contents/vray/shaders
Installation On Mac OS DR Nodes
For V-Ray “Distributed Render” node installation you only need to copy V-Ray plugins:
$ sudo -i
# cd ~/where/you/have/unpacked/the/archive/workstation/maya2012_vray22_x64/
# cp libvray_VRayScatter.so /Applications/Autodesk/maya2012/Maya.app/Contents/vray/vrayplugins/
Uninstall
To uninstall VRayScatter For Maya you have to manually remove all the installed files.
Activation on Mac OS X
NOTE
- You don't need a license for Batch and DR nodes.
Please make sure you always use the registration utility which is supplied with the particular version of VRayScatter For Maya.
Open your preferred terminal application and start the registration utility:
$ /Applications/iCubeRDGroup/bin/VRayScatterForMayaRegistration
This will generate an VRayScatterForMaya_<UserName>_<Date>.id file on your Desktop.
Send this file to mail@rendering.ru (or your reseller). Please, attach copy of you receipt or order number to avoid any delays in communication.
In the nearest time (usually within 24 hours) you will get an email from us (or your reseller) with *.lic license file attached. Save this file on your hard disk.
Start again the registration utility with the path to the license file argument like:
$ /Applications/iCubeRDGroup/bin/VRayScatterForMayaRegistration /path/to/license/file.lic
or manually copy this file to ~/.config/RDGroup/VRayScatterForMaya.lic like this:
$ mkdir -p ~/.config/RDGroup/
$ cp /path/to/license/file.lic ~/.config/RDGroup/VRayScatterForMaya.lic
In case of license malfunction and errors (which can be caused by disk formatting, reinstallation of the operating system or components replacement) you are free to address the developer at any time. Please make sure you download latest version from our forum and generate new *.id file. Send it to mail@rendering.ru to get your updated *.lic file.
However, we reserve the right not to issue a new license in case of total replacement of a PC if the registration request is submitted more often than once in half a year.
ATTENTION! Please always try to email from the same email address you used when you purchased the plug-in. If we can’t find your e-mail address from which you sent the ID file in our database and there is no explanation and receipt or order number in you email, your request may not be processed!
Please always attach you receipt or order number to avoid any delays in communication.
Usage
VRayScatter Creation
- Select mesh or curve object you want to distribute objects at.
- In menu choose: Create → R&D Group → VRayScatter.
- VRayScatter bounding box and logo will appear. Use it to select VRayScatter.
User Interface
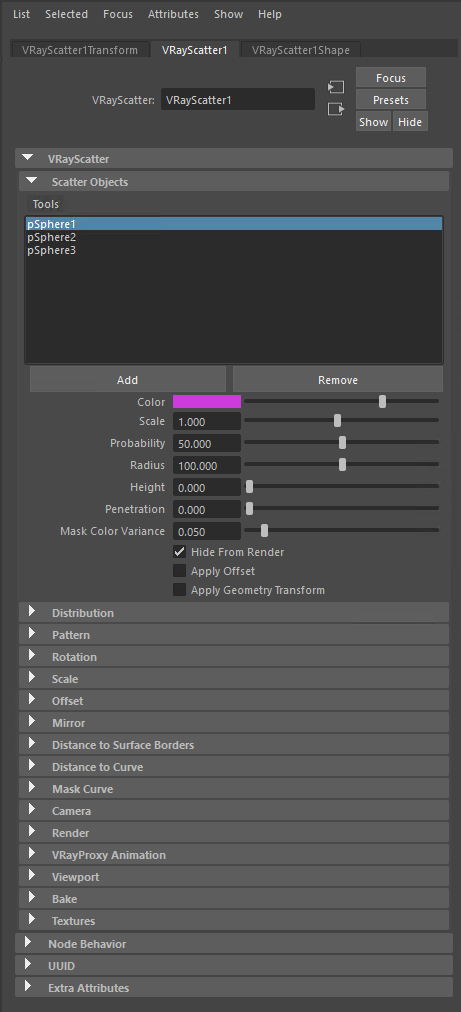
- Select objects to distribute (Mesh or VRayProxy) then select VRayScatter and press Add in «Scatter Objects» rollout. This will connect objects to the “scatterObject” attribute.
- If you have added multiple objects tweak the Probability parameter to make all objects visible or use menu Tools → “Auto Probability”.
Parameters Description
Scatter Objects rollout
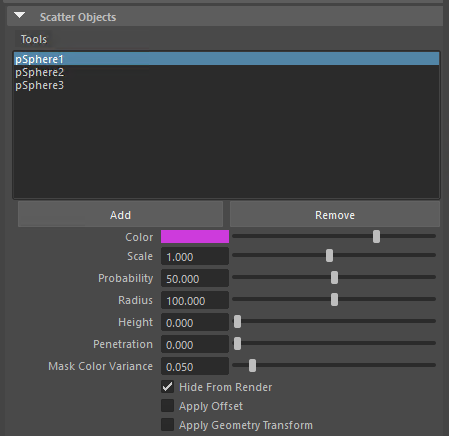
- Scatter Objects – list of scattered objects.
- Color – object's drawing color in viewport.
- Scale -
- Probability – probability of the object's appearance.
- Radius – radius of the collision sphere for the collision solving. Default value is 100% - that corresponds to the object size.
- Height – addition offset of the collision sphere.
- Penetration – sets the blur of the collisions border areas.
- Mask color variance – threshold for colorful mask.
- Hide From Render – hide original object from render.
- Apply Offset
- Apply Geometry Transform
Distribution
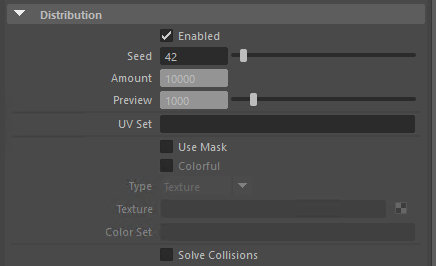
- Seed – initial random seed.
- Amount – render objects amount.
- Preview – preview objects amount.
- UV Set -
- Use Mask – use distribution mask texture.
- Colorful - use colorful mask; this will place objects by the texture using object “Draw Color”.
- Type:
- Texture
- Color Set
- Both
- Texture – distribution mask texture. This could be any Maya texture.
- Color Set -
- Solve Collisions – solve scatter objects collisions.
Distribution Cache

Pattern
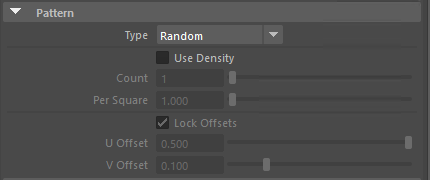
- Type – pattern type
- Random
- Pattern 1 - Pattern distribution uses UV-mapping to work, thus object must have proper UV-coordinates.
- Pattern 2
- Pattern 3
- Random Sticked
- Use Density – random position settings include only this one additional option. With it you can set the number of objects (Count) to be located at a single area unit (Per Square). The resulting number will also be fixed with ‘Max Count’ option. The area is defined by system units. It means that in the case when centimetres being used in system units one single object will fall within 1 square meter.
- Count
- Per Square
- Lock Offsets – when this option is enabled you will to control both U and V offsets simultaneously.
- U Offset – U offset.
- V Offset – V offset.
Rotation
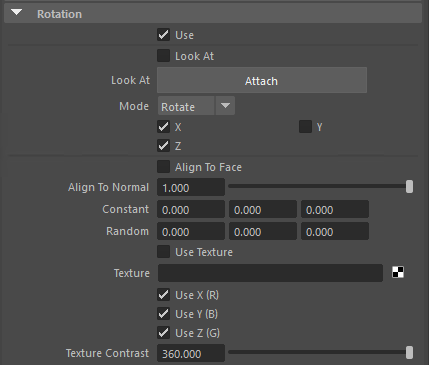
- Use – quick control to enable/disable rotation features.
- Look At
- Attach
- Mode: Rotate or Track
- X, Z, Y
- Align To Face
- Align To Normal – align object to surface normal.
- Constant – constant rotation (for each axis).
- Random – random rotation (for each axis).
- Use Texture – Use rotation texture.
- Texture – rotation texture. Red color represents rotation around X, Blue – Y, Green – Z. Color value 0.0 equals to rotation of 180 degrees to one direction, color value of 0.5 leaves the rotation state unchanged, color value of 1.0 makes the rotation of 180 degrees to another direction.
- Use X, Y, Z – quick control to enable/disable rotation about each axis when using texture.
- Texture contrast – quick control of texture contrast.
Scale
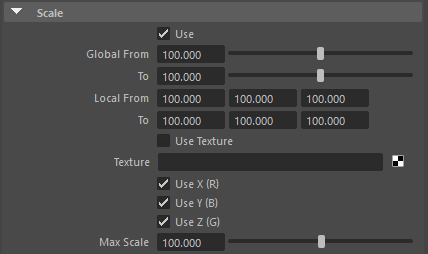
- Use – quick control to enable/disable scale features.
- Global From/To – global minimum/maximum scale. The actual scale will be a random value between From and To values.
- Local From/To – per-axis minimum/maximum scale. The actual scale will be a random value between From and To values.
- Use Texture – Use scale texture.
- Texture – scale texture. Red color represents X scale, Blue – Y, Green – Z.
- Max Scale – maximum scale that corresponds to the 1.0 color value.
Offset
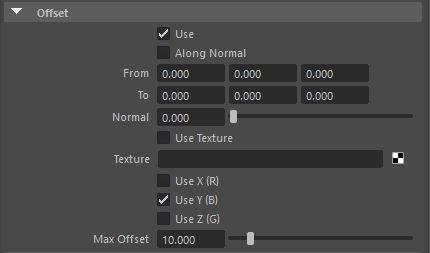
- Use – quick control to enable/disable offset features.
- Along Normal – offset objects along surface normal.
- From/To – minimum/maximum offsets. The actual offset will be a random value between From and To values.
- Normal – additional normal offset.
- Use Texture – Use offset texture.
- Texture – offset texture. Red color represents X offset, Blue – Y, Green – Z.
- Max Offset – maximum offset that corresponds to the 1.0 color value.
Slope Control
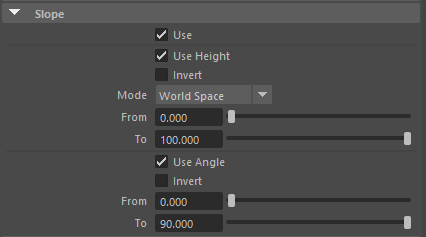
- Use height
- Invert
- Mode
- World Space
- Bounding box
- From/To
- Use Angle
- Invert
- From/To
Mirror

Distance to surface borders
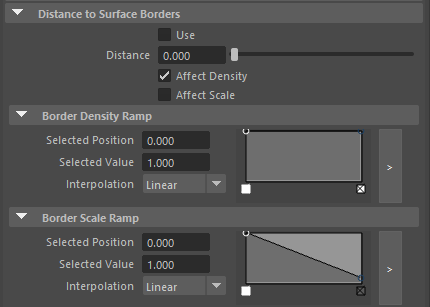
- Use – quick control to enable/disable surface border features.
- Distance – maximum distance from object to surface border in which object parameters will be affected. Actual control parameter behaviour could be defined using Density and Scale ramps.
- Affect Density
- Affect Scale
- Border Density Ramp
- Selected Position
- Selected Value
- Interpolation - None, Linear, Smooth, Spline
- Border Scale Ramp
- Selected position
- Selected Value
- Interpolation - None, Linear, Smooth, Spline
Distance to curve
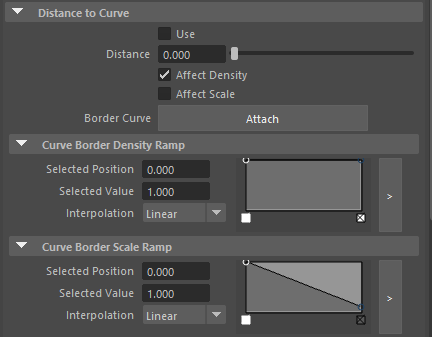
- Use – quick control to enable/disable curve border features.
- Distance – maximum distance from object to curve in which object parameters will be affected. Actual control parameter behavior could be defined using Density and Scale ramps.
- Affect Density
- Affect Scale
- Border Curve Attach – attaches selected curve.
- Curve Border Density Ramp
- Selected position
- Selected Value
- Interpolation - None, Linear, Smooth, Spline
- Curve Border Scale Ramp
- Selected position
- Selected Value
- Interpolation - None, Linear, Smooth, Spline
Mask curve

- Use – quick control to enable/disable mask curve features.
- Inverse – inverse mask curve behaviour.
- Projection Plane
- Render-Time Clipping
- Mask Curve Attach – attaches selected curve.
Camera
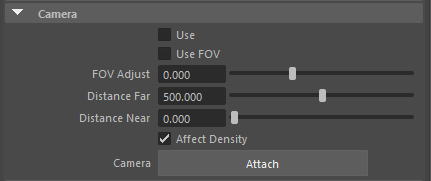
- Use – quick control to enable/disable camera features.
- Use FOV – limits rendered objects to only that are seen from camera field of view. Could save some RAM.
- FOV Adjust
- Distance Far – distance from camera.
- Distance Near
- Affect Density – limits objects visibility to distance.
- Camera Attach – attaches selected camera.
Render
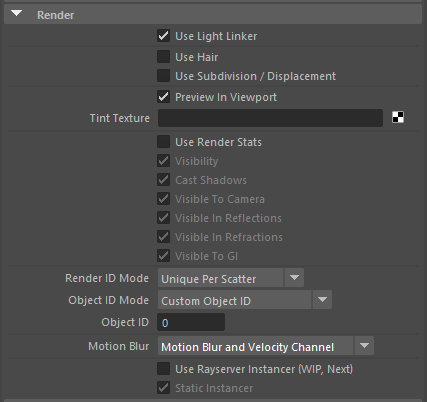
- Use Light Linker - this feature will transfer Light Linker setup from objects used in scatter to instanced objects.
- Use Hair
- Use Subdivision / Displacement
- Preview in Viewport
- Tint Texture - check VRayScatter Texture section for howto.
- Use Render Stats
- Visibility
- Cast Shadows
- Visible To Camera
- Visible To Reflections
- Visible To Refractions
- Visible To GI
- Render ID Mode
- No ID
- Instance Render ID
- Unique Per Scatter
- Unique Per Instance
- Object ID Mode
- Custom Object ID
- Instance Object ID
- Instance / Proxy Object ID
- Object ID
- Motion Blur
- No Motion Blur
- Motion Blur and Velocity Channel
- Velocity Channel Only
- Use Rayserver Instancer (WIP, Next)
- Static instancer
VRayProxy Animation
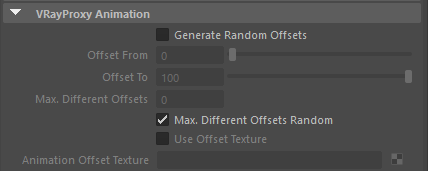
This feature works only when scattering VRayProxy and allows to assign different frame offset.
- Generate Random Offsets
- Offset From/To – From/To frame offset. Actual frame offset is a random value between From and To.
- Max. Difference Offset Random
- Use Offset Texture - use texture to drive frame offset; black = “Offset From” value, white = “Offset To” value.
- Animation Offset Texture
Viewport

- Draw style – objects draw style in the viewport.
- None
- Point
- Box
- Mesh Preview
- Draw Alpha
- Draw Point Size
- Logo color - color for the locator logo and bounding box.
- Logo size – locator logo size.
Bake

This feature allows to “bake” scattered objects to real Maya objects. Use this feature very carefully because it could add too many objects to your scene.
- Bake Mode
- Preview
- Render
- Bake Type
- Instance - new objects will be linked with one geometry.
- Copy - geometry data will also be duplicated.
- Duplicate Input Connection
- Group
Textures

VRayScatter Texture
VRayScatter texture is used for color randomization of scattered objects. To use this feature do the following:
Setup VRayScatter:
- Enable “Use Tint Texture” option in VRayScatter's “Render” rollout.
- Setup “Tint Texture”. You could use any Maya texture to control color variance (like Noise or File)
Setup scattered object (this example uses diffuse color variance):
- Make sure object uses “VRay Mtl”
- Add “VRay Scatter Texture” to diffuse slot. “VRay Scatter Texture” is located in “Utilities” section in Maya textures.
- Add “Base Texture” to “VRay Scatter Texture” if needed
Now render your scene and look at color variance.
Troubleshooting
License error
VRayScatter: Incorrect license!
if this is happens right after activation, please restart Maya
In case of license malfunction and errors (which can be caused by disk reformatting, re-installation of the operating system or components replacement) you are free to address the developer at any time by sending your request for a new *.LIC file to mail@rendering.ru.
Does not appear in create menu
- Please make sure all files were placed into right folders.
- Start Maya and enable Load and/or Auto load in Window → Settings/Preferences → Plug-in Manager for the VRayScatter plug-in.
Log
Check your log for any errors, also from version 4.405.154 you can now setup environment variable ICUBE_DEBUG to 1, this will produce more info from VrayScatter
Other errors
Please make sure you download and install latest version from our forum
If this haven't solved the problem please contact us at mail@rendering.ru, by sending description of the problem together with the following information:
- VRayScatter version
- Maya version
- V-Ray version
- Some screenshots will be useful
- The scene file facing the problem (if possible)
