Это старая версия документа!
Содержание
MadCar инструкция по пользованию
MadCar представляет из себя плагин для 3дс макс для быстрого риггинга колесных транспортных средств и их анимации путем симуляции управления. Новая версия представляет возможность настройки транспортных средств с любым количеством колес и любым их взаимным расположением. Так же возможна настройка любого количества прицепов. Возможна как упрощенная настройка поведения каждого из колес и подвесок, так и тонкий тюнинг, позволяющий получить эффект движения как гоночного болида, так и тяжелого грузовика.
Анимация создается в процессе симуляции в реальном времени. Управление симуляцией возможно как с клавиатуры, так и при помощи джойстиков, игровых манипуляторов или рулей. Так же реализован режим «следование за объектом». Пакет так же включает в себя процедурную карту, генерирующую следы от шин на поверхности, по которой движется транспортное средство. Поддерживается 3дс макс 2008-2011 32 и 64 бита.
Пакет так же включает в себя процедурную карту, генерирующую следы от шин на поверхности, по которой движется транспортное средство (только для Vray)
System requirements:
3ds Max versions: 2008, 2009, 2010, 2011, all 32 or 64 bit
3ds Max Design : all
Tire marks require V-Ray
OS: Windows XP, Windows Vista, Windows 7, all 32 and 64 bit
User must have local administrator rights with Windows XP to use MadCar. on Windows 7 administrator right needed only during installation
Installation
Users are provided with the same installation file for both Workstation and Render node
MadCar.exe
Workstation can be used only when license is properly installed, and provides access to all MadCar options.
If MadCar does not find license file it switches itself to Rendernode mode and only can render files created with MadCar Workstation
Rendering is available both locally and over network.
To install the program you need to run the MadCar.exe with the administrator rights. (In windows 7 right click «run as administrator») even if you are logged in as admin.
Registration
Start the MadCarRegistration32x.exe or MadCarRegistration64x.exe utility (for 32-bit or 64-bit systems accordingly)
Please make sure you always use the registration utility which is supplied with the particular version of MadCar
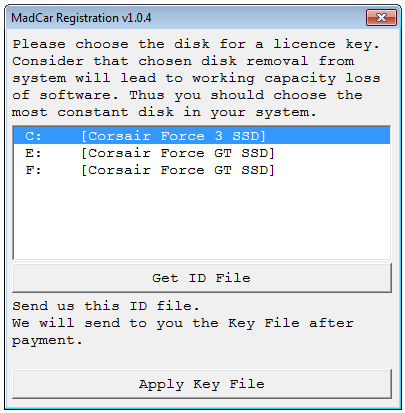
Choose the hard disk to be linked with the MadCar license (linking with external USB storage, Flash drives and network drives is not supported).
Press the «Get Your ID File» button and save *.id file on your hard disk under any name you like.
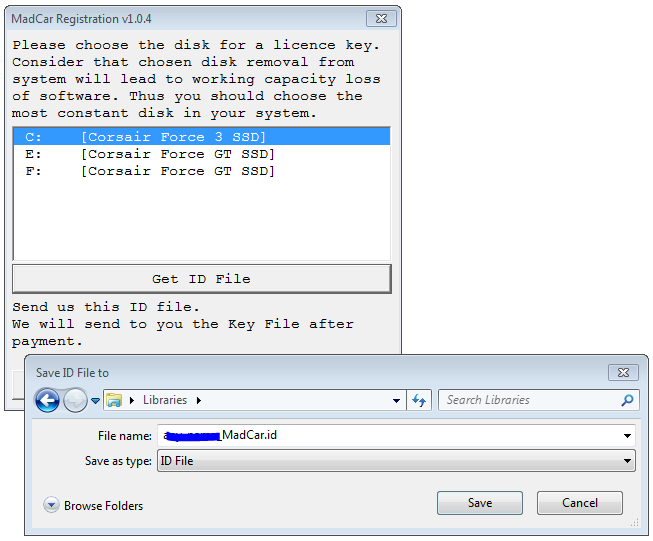
Send this file to mail@rendering.ru (or your reseller). Please attach copy of you receipt or order number to avoid any delays in communication.
In the nearest time (usually within 24 hours) you will get an email from us (or your reseller) with *.key license file attached. Save this file on your hard disk. Start again MadCarRegistrationXX.exe utility and press the «Apply Key File» button.
In the dialogue box select the *.key file you received from us. With this registration procedure is over.
In case of license malfunction and errors (which can be caused by disk formatting, reinstallation of the operating system or components replacement) you are free to address the developer at any time. Please make sure you download latest version from our forum and generate new *.ID file. Send it to mail@rendering.ru to get your updated *.Key file
However, we reserve the right not to issue a new license in case of total replacement of a PC if the registration request is submitted more often than once in half a year.
ATTENTION! Please always try to email from the same email address you used when you purchased the plug-in. If we can’t find your e-mail address from which you sent the ID file in our database and there is no explanation and receipt or order number in you email, your request may not be processed!
Please always attach you receipt or order number to avoid any delays in communication.
Создание MadCar
Создать MadCar можно из панели
Create > Helpers > MadCar
Плагин содержит следующие типы объектов:
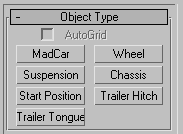
- Chassis - корпус
- Suspension - амортизатор
- Wheel - колесо
- MadCar - управляющая оболочка.
- Start Position - начальное положение машины.
- Trailer Hitch and Trailer Tongue - объекты сцепления двух транспортных средств.
Не масштабируйте эти объекты и не отражайте зеркально. Допустимо только перемещение и вращение.
Ко всем объектам можно линковать геометрию.
К chassis - можно прилинковать геометрию корпуса машины. К suspension можно прилинковать тормозные колодки и части подвески. К wheel можно прилинковать геометрию колес.
Chassis
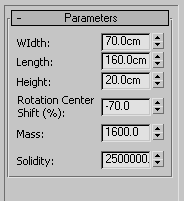
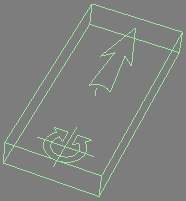
Chassis sets the overall dimensions of the car, its mass and solidity at sudden wheels collision with surface.
- Width equals to half width of a car.
- Length equals to half length of a car.
- Height equals to half height of a car.
- Mass is the car mass in kilograms. Solidity is the car’s structural stiffness.
- Rotation Center Shift - положение центра вращения.
- Solidity - жесткость корпуса.
Mass - Масса определяет инертность машины. Чем она больше, тем сильнее проседает подвеска, машина медленнее разгоняется и тормозит.
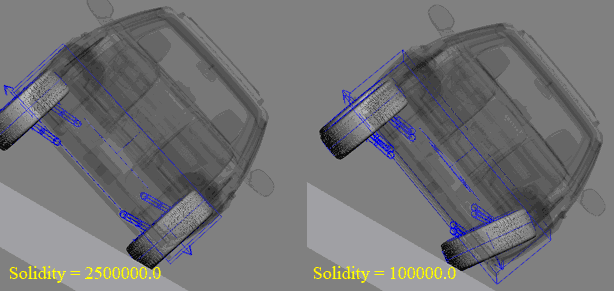
Solidity Жесткость корпуса задает сопротивление деформациям. При резком столкновении колес с поверхностью их оси могут сгибаться и отклоняться от начального положения. Чем выше жесткость, тем меньше будут отклонения.
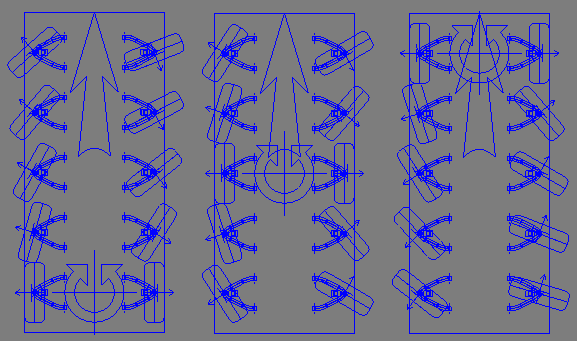
Положение центра вращения влияет на поведение управляющих колес. Ниже примеры для значений - -75%, 0%, 75%.
Suspension
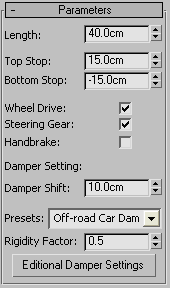
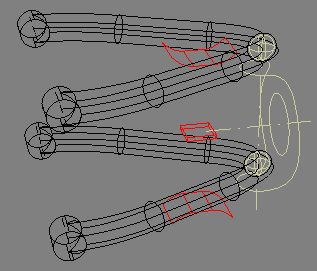
Задает параметры подвески, такие как длину поперечных рычагов, жесткость пружины, гашение колебаний маслом, упругость газа в буфере, ограничители хода подвески, привод двигателя, рулевой привод, и другие параметры.
Length - длинна поперечного рычага.
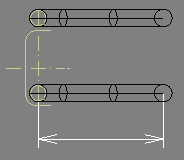
Top Stop и Bottom Stop - Верхний и нижний ограничители хода подвески
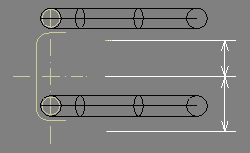
Wheel Drive - привод двигателя
Steering Gear - рулевой привод. Колесо будет поворачиваться при вращении рулем.
Handbrake - колесо блокируется ручным тормозом.
Настройки амортизатора
В плагине используется модель масляно-газового амортизатора.
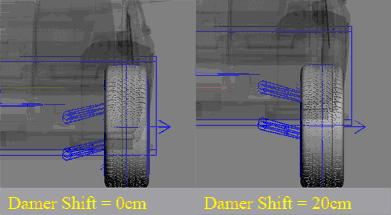
Damper shift - смещение верхнего крепления амортизатора.
Presets - для более быстрой настройки без глубоких знаний работы амортизаторов есть возможность выбрать предустановленные параметры.
Rigidity Factor - параметр для изменения результирующей жесткости амортизатора без настроек множества параметров по отдельности. В большинстве случаев этого параметра достаточно для регулировки.
Additional Damper Settings - детальная настройка амортизатора. Предназначены для опытных пользователей с возможностью тонкой настройки амортизатора.
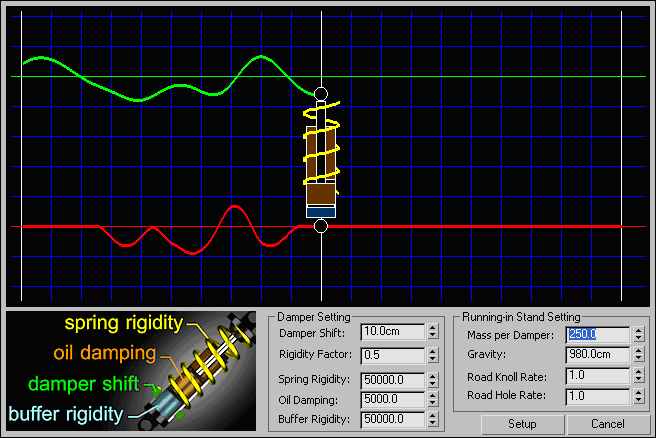
Тестовая система генерирует неровности на дороге в реальном времени и показывает, как на них реагирует амортизатор.
- Damper Settings - настройки амортизатора.
- Spring Rigidity - жесткость пружины.
- Oil Damping - сопротивление масла.
- Buffer Rigidity - жесткость буфера..
- Running-in Stand Setting - параметры тестового стенда.
- Mass per Damper - масса, приходящаяся на амортизатор. К примеру, если машина весит 1000кг, и у нее 4 колеса, то на один амортизатор придется 250кг.
- Gravity: ускорение свободного падения. В сантиметрах - 980см/c2, в метрах - 9.8см/c2, в дюймах - 386«/c2.
- Road Knoll Rate - частота кочек на дороге.
- Road Hole Rate - частота дыр на дороге.
Wheel
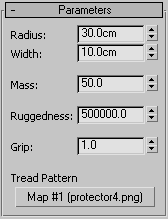
Задает размеры и свойства колеса.
- Radius - радиус колеса.
- Width - ширина колеса.
- Mass - масса колеса в килограммах.
- Ruggedness - жесткость колеса. Чем меньше жесткость, тем сильнее колесо проседает н поверхности.
- Grip - коэффициент трения с поверхностью. Чем больше коэффициент трения, тем меньше машину заносить, но при этом увеличивается вероятность переворачивания машины в крутых поворотах.
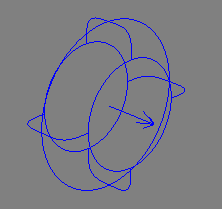
Tread Pattern - рисунок протектора. Используется для генерации текстуры следов. Пример ориентации протектора.

При установки колеса стрелка колеса должна смотреть наружу а не внутрь машины.
MadCar
Данный объект представляет оболочку для объединения компонент машины в одно целое.
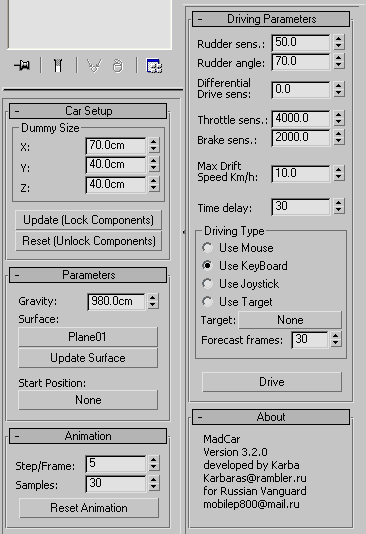
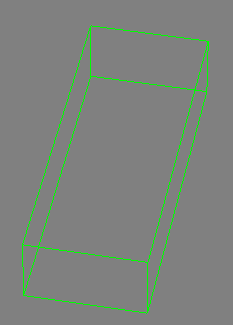
Car Setup - сборка машины в одно целое.
Dummy Size - размеры оболочки.
Все компоненты, оказавшиеся внутри оболочки будут автоматом задействованы.
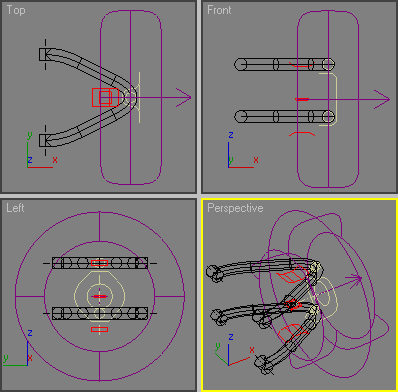
Для сборки машины внутри должен быть один объект chassis и равное число объектов wheel и suspension. Каждая пара suspension и wheel должны иметь одинаковое положение как показано ниже.
Расставьте все компоненты машины в необходимой конфигурации. К примеру:
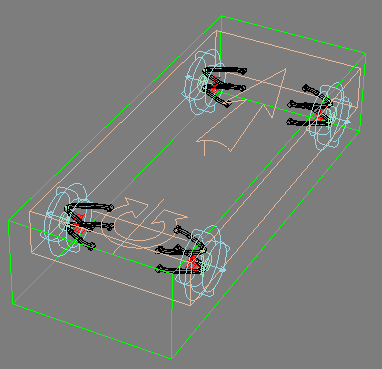
И нажмите Update (Lock Component)
В случае успешного сбора компоненты должны заблокироваться(их нельзя перемещать) и окраситься в синий цвет как показано ниже. После данной операции изменения компонент не будут иметь влияния. Для обновления параметров необходимо нажать Update (Lock Component) снова.
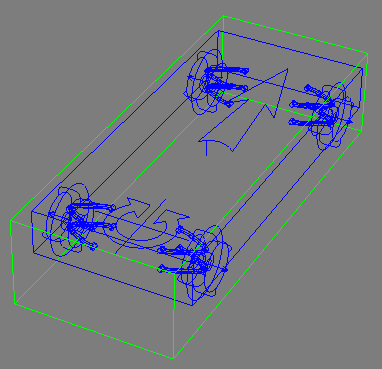
Если вы хотите разблокировать компоненты и изменить их положение, Reset (Unlock Component).
Parameters
Parameters - общие параметры.
Gravity - ускорение свободного падения. В сантиметрах - 980см/c2, в метрах - 9.8см/c2, в дюймах - 386»/c2.
Surface объект поверхности, по которой будет перемещаться машина. после выбора объекта, его изменения, загрузки сцены - необходимо нажимать Update Surface. Это связано с алгоритмом взаимодействия колес с землей использующего ray-trace accelerator, который значительно ускоряет просчет и делает время расчета почти зависимым от числа полигонов в поверхности.
Start Position - задается объект, с положения которого начнется движение машины. Если объект задан, то при нажатии Update (Lock Component) машина автоматически переместится в стартовое положение.
Animation
Animation - параметры расчета и анимации.
Step/Frame - задает число ключей на фрейм. Высокое значение улучшает точность расчета, но приводит к падание скорости расчета, а также приводит увеличение размера сцены на диске. Низкое значение может приводить к неравномерному вращению колес на высокой скорости движения.
Samples - задает число расчетных семплов за шаг. Высокое значение улучшает точность расчета, но приводит к паданию скорости расчета.
Низкие значения данных параметров могут приводить к вибрации колес и сползанию машины по наклонной поверхности вниз в состоянии покоя при включенных тормозах.
Driving Parameters
Driving Parameters are car driving settings.
Rudder Sensitivity is the response of steering wheel. Lower value makes the rudder less reactive. Fix this setting at low values to get smooth/slow turning of wheels, high values will lead to fast wheels turn.
Rudder Angle is the ultimate steering lock.
Differential Drive Sensitivity - multi directional movement of the wheels when turning. E.g. when turning right, the right wheel will be spinning backward, left - forward.
Throttle Sensitivity is the response of accelerator pedal. The higher the value, the higher the impulse given to the driving-wheels.
Brake Sensitivity is the response of brake pedal. High value makes the braking more active/intense.
Time Delay is the time delay between frames, it is set in milliseconds. Time delay is necessary for the distinguishing of CPU time needed for the mouse and keyboard reaction. If the value is too small driving control may have late response or even be blocked. In this case time delay should be extended.
Driving Type is the type of driving control. The following variants are possible:
Mouse is driving control with the mouse. Mouse movements to the left or right direction make the wheels turn respectively. Mouse movements up and down correspond to acceleration and deceleration. Wheel’s running forward throws into forward gear. Wheel’s running backward throws into reverse gear. The mouse right button is responsible for handbrake.
Keyboard is driving control by means of keyboard. «A» key is for turn to the left. «D» key is for turn to the right. «W» key is for accelerator. «S» key is for brake. SPACEBAR is for handbrake. PAGE UP throws into forward gear. PAGE DOWN throws into reverse gear.
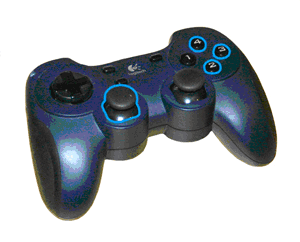
Joystick driving controls are: 4 is forward gear. 2 is reverse gear. 3 is handbrake.
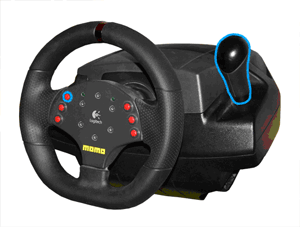
Steering Wheel driving controls: Gearbox handle is responsible for gear shifting (forward gear/reverse gear), marked button is for handbrake.
Target is a target object/ an object to follow. Forecast frames present the number of frames where the car foreshows the movement of object for the track calculation.
Drive
It activates the car driving window.
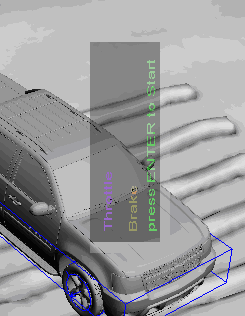
To start/stop driving press ENTER.
Trailers
In order to join two vehicles add Trailer Hitch to the track in place where trailer will be attached.
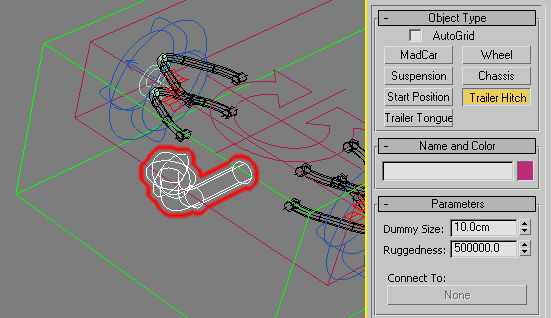
Add Trailer Tongue to the trailer in place where truck will be attached.
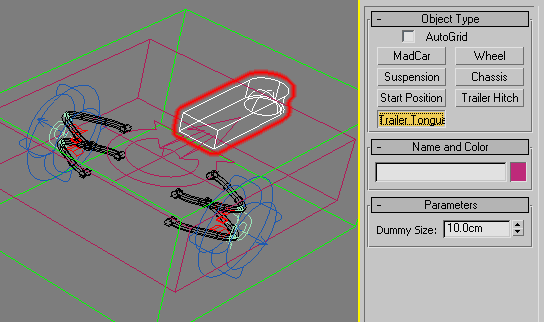
Join Trailer Hitch with Trailer Tongue as shown below
Vehicles are now joined.
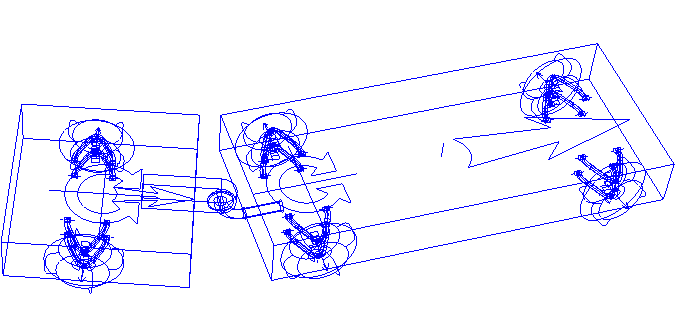
From now on if you move the truck the trailer will follow it
Tire Marks (requires V-Ray)
MadCarTrackTexture. Is used for making tire marks.

MadCar Object - the MadCar object from which the texture generating traces.
- General Intensity - the intensity of the traces in the normal movement of a vehicle.
- Brake Intensity - the intensity of the traces when a wheel is slipping.
- Samples - quality of marks. High values slow down the render.
- Base Bump Intensity - total intensity of the bump.
- Pattern Bump Intensity - bump value of the tire pattern.
Troubleshooting
Possible license malfunction/errors.
In case of license malfunction and errors (which can be caused by disk reformatting, reinstallation of the operating system or components replacement) you are free to address the developer at any time by sending your request for a new *.key file to the email mail@rendering.ru
However, in case of total replacement of a PC by a new one new license is not provided more often than once in half a year. ATTENTION! Please always try to email from the same email address you used when you purchased the plug-in. If we can’t find your e-mail address from which you sent the ID file in our database and there is no explanation and receipt or order number in you email, your request may not be processed!
Please always attach you receipt or order number to avoid any delays in communication.